Workflow
This document presents the (rather elementary) workflow common to Neper and FEPX (herein the program). The text is written specifically for users who would like to contribute to the program and for internal developers (and, ultimately, for maintainers). However, the workflow should be applicable to any other (average-size) program and so may also be of interest to the general reader. In the following, user denotes any user of the program, contributor denotes any user contributing code to the program, developer denotes an internal developer, and maintainer denotes who has full power on the program - only developers and maintainers have access to the private repositories (and some links provided below). No particular background on collaborative software development is assumed.
Tools, Websites and Repositories
Development is made with tools and procedures based on Git and GitHub. The program is made available on the Web as source code, and its development involves both public and private parts. The program has “official releases”, but development also follows the principles of continuous integration for what is the “stable” version of the program, i.e. new features such as bug fixes and small improvements are merged into the code as often as necessary, and tests are run systematically on the program to make sure that all capabilities remain operational and that the output is not modified unexpectedly.
The program has no more that three spaces:
The public website (Neper/FEPX) is a standard “showcase” website and presents the program itself, provides various resources including an online documentation, and links to the latest official release. It contains all is needed to use the program.
The public GitHub repository (
github, Neper/FEPX) is home to the source code tree, which includes the official releases and the continuous-integration versions (a history of the “latest versions”), and is also an interactive space. It is for users who would like to use the latest version of the code or to get in touch with the developers and other users:The Code page (the home page, Neper/FEPX) contains the code and includes the official releases and intermediary versions (the “latest versions”) in a unique, linear branch,
main. Users can get the code either by cloning the repository, or by downloading an official release or the latest version.The Issues page (Neper/FEPX) is where bug reports and feature requests can be submitted .
The Discussions page (Neper/FEPX) is where questions and comments can be submitted.
The Pull requests page (Neper/FEPX) is where code contributions can be submitted.
More anecdotically, this website is contained in a (detached) branch,
gh-pages, which GitHub seamlessly uses to show the website (originally available athttps://<username>.github.io/<program>; https://neper.info and https://fepx.info redirect to these pages).The private GitHub repository (
github-dev, Neper/FEPX) is the developers’ workspace:The code is contained in the
mainbranch (the same as on the public repository), adevelbranch (anddevel-?.?.?branches) and possibly other, new-feature branches. This is detailed below.Interactions among developers take place as on the public repository, using the Issues, Discussions and Pull Requests pages.
In addition to standard Git, developers use two scripts, neperfepx-git and neperfepx-release, as described below.
Branches and Merge Strategy
Note
This description is general and does not consider the case of external contributions, which are detailed in Being a Contributor.
Branches are used to handle different versions of the code (stable, development, etc.), which are on one or both repositories.
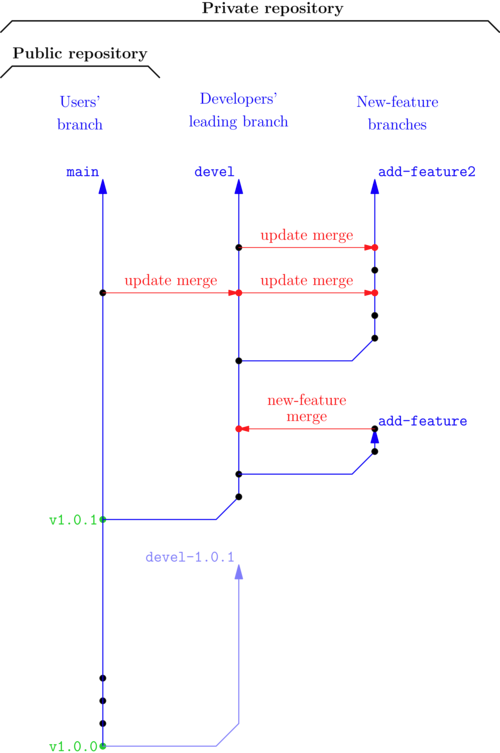
Branches and repositories of the program. Branches are shown in blue (archived branches in light blue), commits in black, merge commits in red, tags in green, and merges in red (note that add-feature itself is not a good branch name…).
Branches
Different branches are used for the different levels of development. In principle, all developments are merged into main on a new release.
The
mainbranch is the “stable” branch and contains the official releases and continuous integration versions (the “latest versions”). It is the branch available on the public repository and is a simple, linear branch. It passes all tests.The
develbranch is the leading development branch. It passes all tests and is used by developers.It is based on the commit corresponding to the last official release on
main(this is done by neperfepx-release).It is kept up-to-date with
main.It can receive direct commits, be the base point of new-feature branches, and get merges directly or through pull requests.
It merges into
main(only using neperfepx-release).
New-feature branches are created to implement new features (which usually require several commits). They should have explicit names, such as
improve-post-report(starting by a verb at the imperative is a good practice).They are based on the
develbranch.They are kept up-to-date with
devel.They generally receive direct commits.
They merge into
devel(as a standard merge or through a pull request).
Branch Management
Keeping Branches Up-to-date
Keeping branches up-to-date with the branches they are based on is important. The rule of thumb is that, on every new commit in main, main is to be merged in devel (this is the responsibility of who commits in main), and, on every new commit in devel, devel is to be merged into the new-feature branches (this is the responsibility of who owns the new-feature branch). This is done as often as necessary to avoid hellish Git merges.
Of course, once updated, the branches (especially main and devel) are pushed to their associated repositories (both github and github-dev for main, and github-dev for devel) to make them available to others.
Merging Branches Back
When complete, the new-feature branches are merged into devel. Before the merge, the new-feature branch should be up-to-date with devel, as described right above. A new-feature branch can be merged in two ways:
if the new-feature branch is on a local repository and is not associated to a pull request on a remote repository, using git merge [--no-ff] <branch_name>.
if the new-feature branch is on the development repository (
github-dev) and associated to a pull request, using git mergepr <remote_repository>/<branch_name> (wheremergepris specific to neperfepx-git, described below).
In both cases, the merge keeps track of all commits of the new-feature branch, unless the --squash option is used.
The devel branch is merged into main only on new releases and using neperfepx-release, described below.
Versions
Version numbers are defined in a standard way, as <major>.<minor>.<patch> (see https://semver.org for a thorough discussion). Typically, patch versions (x.x.1, x.x.2, etc.) gather bug fixes and small improvements, minor versions (x.1.0, x.2.0, etc.) contain new features, and major versions (1.0.0, 2.0.0, etc.) are little revolutions, such as the addition of outstanding new features or global code overhaul. In the special circumstances where backward incompatibility is introduced, the new version should be either a minor or a major version. A new version number is automatically created on each commit. When not associated to a release, a version number is formatted as <major>.<minor>.<patch>-<releasecandidate> when in the main branch, and <major>.<minor>.<patch>-<branch_name>-<releasecandidate> when in a development branch (either devel or a new-feature branch), where patch is the next patch number and releasecandidate increments from 1 (whether the next release is a patch or minor or major release is generally not known in advance, and it will always be considered that it is a patch release - this is generally not problematic, as the new version number will be defined at release). For example, considering only main, the versions immediately following 1.0.0 are 1.0.1-1 (“release candidate for 1.0.1”), 1.0.1-2, etc. and will eventually be part of 1.0.1 (or 1.1.0 if the next release happens to be a minor release, or 2.0.0 for a major release). On an official release, the version number is prefixed v to create a Git tag and GitHub release.
Version numbering is automatically handled by neperfepx-git, described below.
Adding Code to the Program
The rule of thumb is that, on every commit, both the code and documentation should be kept up-to-date and consistent with each other, and so any changes or additions to the code should be documented as they occur. This helps maintaining good documentation.
Making Commits
Any commit should be done using neperfepx-git, which is a replacement for git dedicated to the program and that runs Git with the provided arguments, updates the version number and helps resolving merge conflicts. It should systematically be used, and it is a good idea to simply alias it as git to have it used by default: just add alias git=path/to/neperfepx-git to your ~/.bashrc file.
Note
In the following, it will be assumed that neperfepx-git has been aliased as git.
Commit messages matter (to you now, as they help to structure development, to you in the future, and to others) and should not be neglected. Don’t be too anxious about it, but good formatting is important as well. We follow Torvalds’ directives and also this site. A good commit message looks like this:
Header line: explain the commit in one line (use the imperative)

Body of commit message is a few lines of text, explaining things
in more detail, possibly giving some background about the issue
being fixed, etc etc.

The body of the commit message can be several paragraphs, and
please do proper word-wrap and keep columns shorter than about
74 characters or so. That way "git log" will show things
nicely even when it's indented.

Make sure you explain your solution and why you're doing what you're
doing, as opposed to describing what you're doing. Reviewers and your
future self can read the patch, but might not understand why a
particular solution was implemented.
As said in the second reference, imperative mood just means “spoken or written as if giving a command or instruction”, as in “Clean your room. Close the door. Take out the trash…”. You will see that it is actually used by Git itself, e.g. on merges (Merge ... into ...). Always starting by a verb (at the imperative) also proves to be a very good practice over time because you will find yourself often using the same verbs, such as Fix, Improve, Update, etc., which will make the commit purpose obvious. No full stop (“.”) at the end of the title line will allow you for one more character for actual text (as you are granted only 50 characters for this, remember…).
If a commit is related to a GitHub issue or discussion, make a reference to it (via its number) in the commit message. You can even end the message with, e.g., Closes #2. to get GitHub to automatically close the related issue (here, #2). However, Closes #2. certainly does not make a good commit title, as it says nothing about what the changes actually are (especially outside of the GitHub repository). Sometimes, it is useful to give the long issue number, which is formatted as <author>/<project>#<issue> (for example neperfepx/neper#42, neperfepx/neper-dev#46, neperfepx/FEPX#23, acmelab-ua/FEPX-dev#26, etc.).
Tips and Tricks
Add the following code to your ~/.bashrc to have the current branch printed before the prompt symbol ($) in the terminal:
function parse_git_branch_and_add_brackets {
git branch --no-color 2> /dev/null | awk '{if ($1 == "*") print " ["$2"]"}'
}

function parse_and_cut_pwd {
  pwd | grep Progs | awk -F/ '{print toupper($5)}' | cut -c1-1
}

PS1="\h:\W\[\033[0;33m\]\$(parse_git_branch_and_add_brackets) \[\033[0m\]\$ "
Being a Contributor
Note
To start working as a contributor of the program, you need a GitHub account. You will create a fork of the official repository in your own GitHub space.
Code contributions are to be made via pull requests and, as such, you will first need to fork the program repository, i.e. create a copy of the program repository to your GitHub space. You can then clone the code locally. You will then be able to make changes to the code on your computer.
To make changes, a good practice is to:
make changes in a dedicated, new-feature branch, using as many commits as appropriate.
make sure that, once the all necessary changes have been made, the branch is up-to-date with the official
mainbranch:
$ git checkout main
$ git pull origin
$ git checkout <new-feature>
$ git merge main
merge the
<new-feature>branch into themainbranch using git merge --squash. This will produce a single commit inmain, containing all changes. Describe the changes in the commit message (this later makes it possible to keep the officialmainbranch clean).push your own
mainbranch to your fork.
Then, go the official repository and open a pull request from your own main branch to the official main branch.
Being an (Internal) Developer
Note
To start working as a developer of the program, you need (i) a GitHub account and (ii) to be granted access to the private repository(ies). You also need to configure the connection to GitHub using SSH. You will push code directly to the private repository(ies), not on a fork.
Getting the Code as a Local Git Repository
First, you need to clone the code locally. To get the full code (and code history), you should clone the private repository:
$ git clone git@github.com:neperfepx/neper-dev.git neper # for Neper
$ git clone git@github.com:neperfepx/FEPX-dev.git fepx   # for FEPX
This creates your own, local repository of the code (and code history) hosted on GitHub (but not the issues, etc.). You also want to have access to the public repository (to push, pull, etc.). A possibility would be to clone the public repository as you did for the public repository, but this would create another local repository, which is better to avoid (since there is only one of you). Actually, as you cloned the private repository, a remote was defined in your local repository, which is named origin and points to the GitHub private repository (from which you cloned):
$ git remote show
origin
$ git remote show origin
* remote origin
  Fetch URL: git@github.com:neperfepx/neper-dev.git # for Neper
  Fetch URL: git@github.com:neperfepx/FEPX-dev.git  # for FEPX
  [...]
It is possible to define another remote in your local repository, corresponding to the public repository. To do so, you can rename the first remote (origin) to github-dev and create a remote for the public repository, github:
$ git remote rename origin github-dev
$ git remote add github git@github.com:neperfepx/neper.git # for Neper
$ git remote add github git@github.com:neperfepx/FEPX.git  # for FEPX
From this point, it becomes possible for you to communicate with the public repository just as well as with the private repository. Since you cloned the private repository and its default branch is the devel branch, you are currently on the devel branch. Check out to the main branch, and you will be able to pull both from github-dev and github:
$ git checkout main
$ git pull github-dev main
From github.com:neperfepx/neper-dev # for Neper
From github.com:neperfepx/FEPX-dev  # for FEPX
 * branch            main       -> FETCH_HEAD
Already up to date.
$ git pull github main
From github.com:neperfepx/neper     # for Neper
From github.com:neperfepx/FEPX      # for FEPX
 * branch            main       -> FETCH_HEAD
* [new branch]      main       -> github/main
Already up to date.
(Depending on your system, you may get a warning: Pulling without specifying how to reconcile divergent branches.... In that case, run git config pull.rebase false (you will need to do this only once)).
If you have not done it before on your computer, now is a good time to tell Git who you are, as the information will be used by Git on new commits; you can also tell Git what your favorite editor is, as it will open on new commits:
$ git config --global user.name "John Doe"
$ git config --global user.email johndoe@example.com
$ git config --global core.editor vim
Being a Maintainer
Making “Latest Versions” (Continuous Integration)
Bug fixes and small improvements are simply published as new commits to main, in between official releases. Here is the workflow:
$ git checkout main             # if needed
make changes to files...
$ git add .
$ git commit                    # do not forget to include "Closes #..." in the message, to close the issue
$ git push github main          # make the commit available on github and close the issue
$ git push github-dev main      # make the commit available on github-dev
The main branch should be the same, at all time, on all repositories (public, private and local). As a new commit is pushed to main, users and developers will have to run git pull github main (or git pull github-dev main, for developers, which works equally well) to update their own versions - this is their responsibility.
Of note, as main is modified, the branches based on it should be updated, as described previously.
Making a New Release
New releases are made typically every 2-3 months. This is done automatically, using neperfepx-release.
On a new release, devel is merged into main (which, in simple terms, makes the code that was in devel public). This is not done as a standard merge, however, but so that all developments appear as a single, “release” commit in main (using Git merge’s --squash option). In this way, the main branch is kept clean, while all “development” commits become archived in a branch named devel-<major>.<minor>.<patch> (the new version number).
On a new release, a Git tag and a Git release are created, and the website is updated with links to the new release and documentation.
Managing the Website
The source codes of the website (Neper/FEPX) is in the gh-pages branch, and, when compiled using make html, generates html code in docs. The website sources can be updated at any time on this branch and compiled, and GitHub will seamlessly show the updated website. Synchronization generally takes no more than 30 seconds. On a new release, neperfepx-release updates the website automatically.